Usenet is considered to be the most “private” way to share files. In other words, no MPAA or RIAA watching your back. It is fast, has a lot of content, and it’s getting more popular, even though the technology is almost 30 years old. Time for an introduction.
Sounds great, but let me start off with the downside to Usenet. The biggest disadvantage is that high speed Usenet servers are not free. You need at least some kind of paid subscription plan to be able to get decent speeds on Usenet. For some people this is not a problem, their argument often is that they already pay a lot of money for high speed broadband access, so why not pay a little extra to get the best speeds out of it.
The Quick Solution
For those who are new to Usenet and want the easy route, we recommend trying a free trial at Easynews. This give you all the tools to start downloading from Usenet quickly, and guarantees fast downloads.
The free trial is for 14 days, which comes with up to 30 GB of downloads. A credit card or PayPal address is required to register for a free account, but NO CHARGE will be made. Cancel anytime, no questions asked. If you decide that you like the service, you can stay on beyond the 14 days/30GB download limit and you will then start the account that you chose at registration.
If you’re not satisfied with Easynews you can try other providers. However, a premium service will always cost a few bucks.
The Alternative Solution
1. Download Grabit here.
2. Double click the downloaded file and proceed to install.
When installing make sure ‘Associate Grabit with NZB files’ is selected.

3. Before clicking “Finish” select “Launch Grabit”. If you missed this look for the grabit icon on the desktop and double click it.
4. Once launched you’ll be asked to enter the name of your usenet server. If you have a premium server (highly recommended, e.g. a free trial at Easynews) select the check box and press next.
5. If you selected the checkbox you’ll then be asked for your news server username and password. Enter them and press next.

Note: Your username/password are case sensitive! Be sure to enter them correctly.
6. You be asked whether to retrieve a list of groups from the news server. Select the checkbox and click finish.
7. Grabit will load fully and begin downloading the grouplist. While it’s downloading continue to step 8.

8. Go to the ‘Edit’ menu and select ‘Preferences’.
9. Select the ‘Folders’ tab. Click the button right of the box containing the download directory. Here you can select the folder you want files to download to.
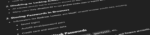
10. Go to your favourite NZB site (eg. newzleech, yabse) and download an NZB file. Double click the NZB file. You’ll be asked whether you want to import the NZB file, just click ‘Grab’.
 NZB file” />
11. The NZB file will be imported. If you’ve done everything right the files should then begin to download.
Downloading:

That’s all there is! Well done you’ve downloaded your first files from Usenet.
The following isn’t completely necessary but can save alot of time, especially if you don’t want to deal with 100s of par/rar files.
1. Download ParNRar here
2. Double click the downloaded file and install.
3. Launch the ‘ParNRar’ by double clicking the purple icon on the Desktop.
4. Click the button on the right of the monitored directory and select your download directory. This is the same place you used for saving files with Grabit.
5. Click ‘Go’. ParNRar will then scan your Grabit download directory checking and extracting any files present.
For extra customization click the ‘Options’ button. There are a range of options to choose from.
One useful option is to have ParNRar check the download folder every X seconds for new parts. To do this select the ‘When done scanning:’ box and change to restart. Then enter a delay between restarts.